
In this article we will describe step-by-step Microsoft SQL Server 2019 installation and tell about all options, components, relevant recommendations and best practices.
MS SQL Server is a leading relational database management system and the main competitor of Oracle Database in the corporate segment.
MS SQL Server 2019 Editions
There are 5 MSSQL 2019 editions:
- Express is a free edition. It has a limited number of features, the most important restriction is the maximum database size of 10 GB. This edition is suitable for small projects, like student works, or studying SQL/T-SQL;
- Standard is a full-featured commercial edition. However, it also has some restrictions. The maximum RAM size the SQL Server can use is 128 GB. AlwaysOn availability groups and some other components are not included. The Standard edition may be applied in small organizations;
- Enterprise includes all possible features and components without any restrictions. The Enterprise edition is typically used by large corporations or companies that require features offered in it;
- Developer edition, like the Enterprise one, doesn’t have any restrictions and is free, but you can use it only to develop and test apps;
- Web edition is similar to Standard, but it has more restrictions and, consequently, lower licensing cost.
SQL Server Licensing
MS SQL Server uses 2 licensing models:
- PER CORE — MSSQL is licensed depending on the number of physical cores on a host (server);
- SERVER + CAL — a license is purchased for a server and each user working with it.
Enterprise edition can be licensed using PER CORE model only.
Also, you can license containers, virtual machines and Big Data Clusters in MSSQL Server 2019.
SQL Server Standard may be licensed using either of the models (Server+CAL or Per Core).
SQL Server Enterprise is licensed using Per Core model only.
SQL Server Per Core Licensing
This licensing model is used for servers with a lot of clients or in cases when the number of clients is unknown. The licensing model allows an unlimited number of users or devices to connect to the SQL Server both inside or outside your organization.
You don’t need to purchase additional client licenses (CALs).
Per Core model assumes that you buy licenses to cover all cores of your host running SQL Server. Here are the main requirements and restrictions:
- One license per two cores (2Lic Core);
- To license a server, you must buy at least two 2-core licenses;
- When running on a physical server (physical operating system environment — POSE), all server cores must be licensed.
MS SQL Server CAL + Server Licensing
According to this licensing model, one server license is purchased for each SQL Server instance. The license is tied to a physical (virtual) server (the number of sockets and cores on the host doesn’t matter). Then you will have to buy client licenses (CAL) for each device or user connecting to your SQL Server.
SQL Server CALs (like RDS CALs) are of two types::
- User CAL is purchased for user accounts that connect to SQL Server with a server license;
- Device CAL – is purchased for all devices used to connect to SQL Server with a server license.
Each SQL Server CAL allows connecting to any number of SQL Server databases and instances.
Since User CAL and Device CAL have the same price, it is recommended that you evaluate the cost-effectiveness of purchasing user or device licenses type in advance.
SQL Server licensing examples:
- 20 users use SQL Server from 20 known devices. In this case, it doesn’t matter what type of SQL CAL to buy.
- 20 users use SQL Server from 50 devices. In this case, it is better to purchase ‘per user’ CALs.
- 50 users use SQL Server from 20 devices. In this case, it will be efficient to buy ‘per device’ CALs.
The following does not matter when estimating the number of SQL Server CALs:
- The number of hosts running SQL Server in your company;
- The number of user accounts on servers;
- The number of concurrent connections to servers;
- The number of business applications between your SQL Server and clients;
- The number of RDS (terminal) servers between SQL Server and clients;
- Users in the staff of any companies;
- Device ownership by people or companies.
For correct licensing, use SQL Server CALs of the same or newer version as your SQL Server. For example, to access SQL Server 2017 Standard Edition, you need SQL CAL 2019 or SQL CAL 2017.
Starting SQL Server Installation
In this article, we will install MS SQL Server 2019 Enterprise Edition on Windows Server 2019.
- Download and mount the SQL Server 2019 installation image. Run setup.exe.
- Since in this article we will install a standalone instance, select New SQL Server stand-alone installation in the Installation tab.
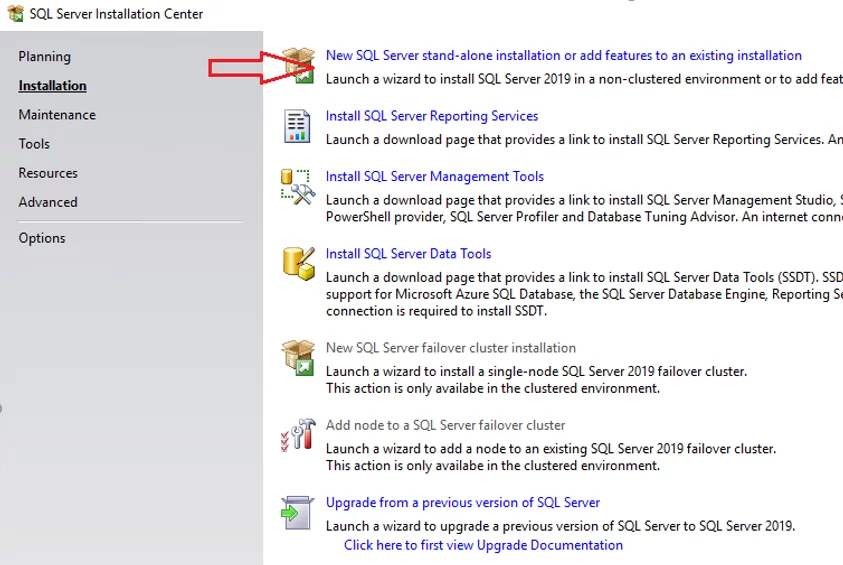
You can do many other things in the SQL Server installation wizard: upgrade a previous instance, fix any errors, etc.
SQL Server Update Settings
At this step, you can enable the search for updates via Windows Update. It’s up to you to decide whether to do it. If you don’t have a clear update plan for your servers, it is better to enable this setting.
Error 0x80244022: Exception from HRESULT: 0x80244022

It is related to Windows Update issues. Here you can find how to solve them: https://woshub.com/windows-update-error-0x80244010-exceeded-max-server-round-trips/
Click Next.
The Install Setup Files step will be done automatically. It will prepare SQL Server files for the installation.
Install Rules will also be done automatically if the wizard doesn’t find any problems to be solved prior to MSSQL installation (like the prompt to restart your computer or incompatibility of your Windows edition with the SQL Server version).
SQL Server Installation Type
In this step, you can select whether to install a new instance of SQL server or add features to an installed instance. In our case, check “Perform a new installation of SQL Server 2019”.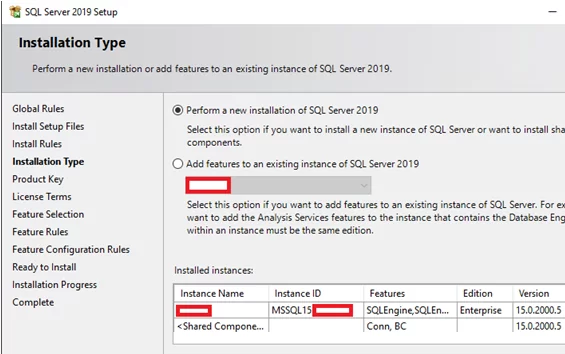
Then enter your SQL product key. If you don’t have it, select the free edition (like Developer), but remember that with the Developer edition you can only develop or test software (don’t use in production tasks).
In the License Terms step, accept the license agreement.
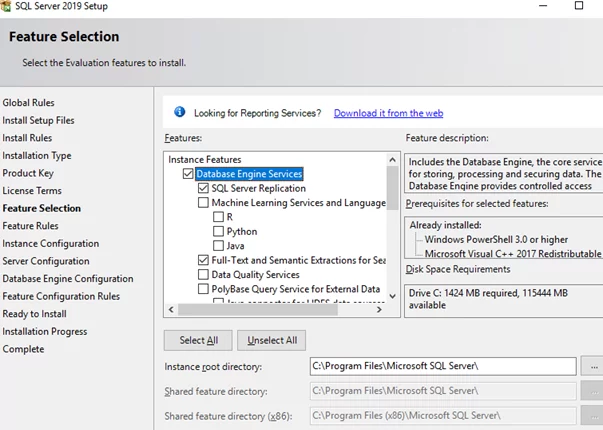
Installing SQL Server 2019 Components
In this step, you are prompted to install different SQL Server components. Let’s see what they are and which of them to install:
- Database Engine Services is a basic SQL Server engine that must be installed.
- SQL Server Replication is the replication services. This feature is used quite often, so if you are not sure whether you need it, it is better to check it for the installation.
- Machine Learning Services and Language Extensions are the services that run an R/Python/Java code in the SQL Server context. It is necessary if you are going to use Machine Learning.
- Full-Text and Semantic Extractions for Search – you will need this feature if you need a full-text search technology or semantic search in the documents (for example, in .docx). In case of semantic search, you will also need FILESTREAM. We will tell about this feature later.
- Data Quality Services are the services to correct or validate data. If you are not sure if you need DQS, it is better not to install it.
- PolyBase Query Service For External Data allows access to external data, for example located on another SQL Server or in Oracle Database. Java connector for HDFS data sources is related to the PolyBase technology and if you want to use HDFS technology, install it.
- Analysis Services is also known as SSAS. The technology is used for business reporting (BI) and OLAP in large companies.
Then move on to the list of Shared Features (functions that apply to the entire server, and not to a specific instance).
- Machine Learning Server (Standalone) is the same as Machine Learning Services and Language Extensions, but it can be installed without the SQL Server engine.
- Data Quality Client is a standalone DQS version.
- Client Tools Connectivity includes ODBC, OLE DB and some other libraries. It is recommended to install them.
- Integration Services are data integration services, also known as SSIS. It is used in data ETL (Extract, Transform, Load). SSIS are necessary if you want to import data automatically and change them while importing. Scale Out Master/Worker are used to scale SSIS operation. If you are not sure if you need them, don’t check the feature.
- Client Tools Backwards Compatibility are legacy DMVs and system procedures. These are recommended for installation.
- Client Tools SDK is a developer tool kit. If you are not sure you need it, don’t install the SDK.
- Distributed Replay Controller/Client duplicates and improves SQL Server Profiler features. Distributed Replay services simulate load for different performance tests.
- SQL Client Connectivity SDK is as ODBC/OLE DB SDK for developers.
- Master Data Services is a Microsoft Power BI component. It is used to analyze, validate, integrate or correct data.
Some of the features (like Java connector for HDFS data sources) may not be available in previous SQL Server versions.
In the same step, you can specify a directory for SQL Server files. Unless you have a compelling reason to change it, leave the default (C:\Program Files\Microsoft SQL Server\).
After you have selected MSSQL features you need, the installation wizard will check their compatibility with your system, and if there are no problems, this step will be completed automatically.
SQL Server Instance Name
You can leave the Default Instance option. Then the name of your instance will be MSSQLSERVER. If you select Named Instance, you can configure your SQL Server name. In my case, I’ll name my instance DEV. It is recommended to enter the same Instance ID as its name to avoid confusion.
In the Installed instances list, MSSQL instances installed on the server are shown. I have got one.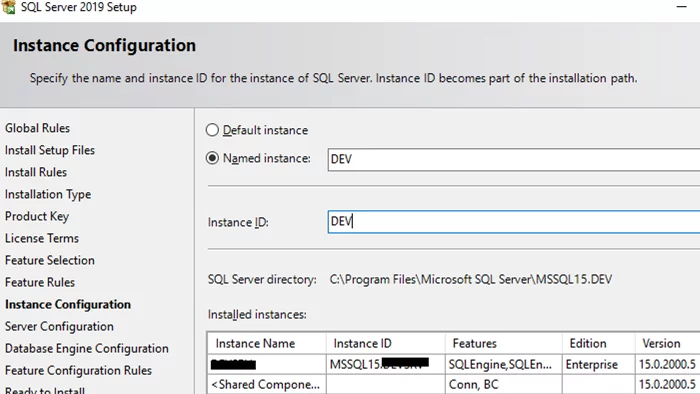
Configuring SQL Server Service Settings
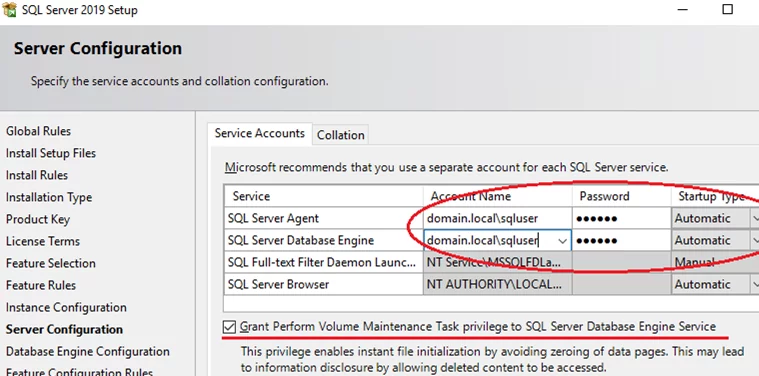
On the Service Accounts tab, specify the accounts under which SQL Server services will run on the host. The best practice is to use MSA (Managed Service Accounts) or gMSA (Group Managed Service Accounts) as they are the most secure ones. I will use a regular domain user account.
Set the Startup Type to Automatic for the SQL Server Agent or you will have to run the agent manually.
Also, you can set IFI (Instant File Initialization) during the server installation starting from SQL Server 2016. It is called “Grant Perform Volume Maintenance Task privilege to SQL Server Database Engine” in the installation wizard. If you enable it, old data won’t overwritten with zeroes if you:
- Create a database;
- Add data to data or log files;
- Expand the size of existing files (including auto-growth operations);
- Recover a database or file group.
It will speed up file initialization, but affects security since old data are not zeroed (old information in the files may be partially available).
I recommend to enable the setting if the data leak threat is low.
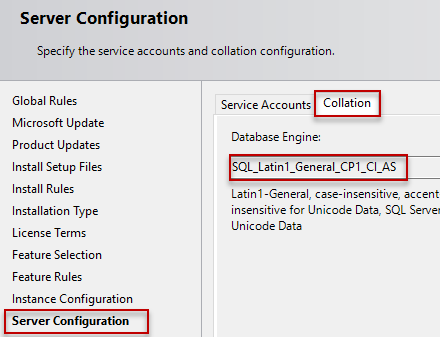
In the next step, you must select the Collation.
Collation is the SQL Server encoding. This parameter sets page encoding, sorting rules, char/varchar encoding and other language-related settings.
During server installation, you select Collation for the whole SQL Server. After the installation, you will be able to edit the setting, but it is rather hard to do it, so it is better to select a suitable Collation at once.
If you have data in English only, you may select SQL_Latin1_General_CP1_CI_AS.
If you are going to use SQL Server in productive tasks, see the Collation section of the documentation, since it is an important setting though it can be set for each database separately.
Configure Database Engine Options on SQL Server
In the Database Engine Configuration step, 6 tabs are available, let’s look at them in turn:
In Server Configuration, select Authentication Mode and specify the SQL Server administrator account.
You have 2 modes to choose from: Windows authentication mode and Mixed mode.
- Only users of your domain or computer running Windows will be able to authenticate using Windows authentication.
- In the Mixed mode, you will also be able to authenticate using your SQL Server account.
Microsoft recommends using Windows authentication as the most secure method, however, in practice you are likely to log on to your server from other apps as well. For example, from those written on Java. Then you will have to use SQL Server authentication.
If you are sure that your users will only log on from Windows computers or apps that support Windows authentication, then select Windows authentication mode.
In my case, I check Mixed mode. In this mode, you will have to specify a sa user password and select a Windows account that will have admin privileges.

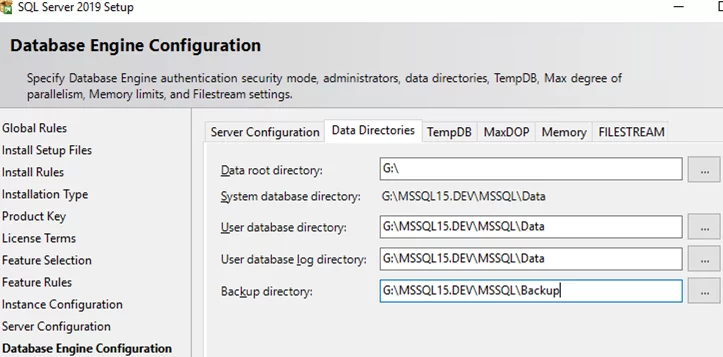
In the Data Directories tab, select the directory where your SQL Server will store database files and transaction logs.
It is better to use a separate RAID drive to store your data. A disk subsystem is critically important for an SQL Server performance, so use the best available variant of data storage, for example, NAS or a local RAID of fast disks.
Keeping all directories (system databases, user database logs, backups) in different storages is considered a good practice. Thus, you will get maximum SQL Server performance on the data storage level.
In my case, I will specify a separate RAID 1 drive for all folders.
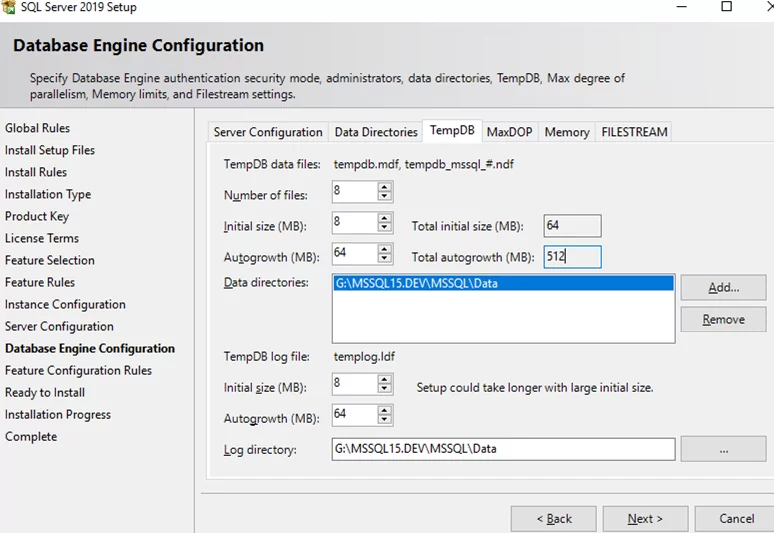
In the TempDB tab, you can configure tempdb settings. Its correct configuration is important for your server performance, since this database is involved almost in all operations with data.
- Number of files is the number of data files for tempdb. You must specify the number of files depending on the number of CPU cores. A good practice is to specify the number of files equal to the number of CPU cores divided by 2. It means that 16 files are recommended for a 32-core server. Also, it is not recommended to specify less than 8 files independent of the number of cores. It is necessary to avoid problems described here: https://support.microsoft.com/en-us/kb/2154845 .
- Initial size is the initial size of tempdb data files. After each server restart, the tempdb size will be reset to its initial size. It is recommended to specify the data file size depending on the planned load. If you cannot estimate it, leave the value at 8 MB. If you allocate a special array/drive for your tembdb files (we will discuss it below), it is better to specify the file size so that they occupy the whole disk to avoid constant file growth.
- Autogrowth is the step of tempdb file incremental growth. This parameter must be set depending on the initial size. Leave it 64 MB if you cannot estimate your future load. Note that if IFI (Instant File Initialization) is enabled, the time to wait for file growth block will be significantly less. It is not recommended to set a large value of the incremental size, since it will result it considerable delays when increasing the file size.
- Data Directories are the directories where tempdb files will be located. If you specify multiple directories, the files will be placed following the Round-robin algorithm, i. e., in a cycle. In other words, if you specify 4 directories, the data files will be distributed equally across all directories. The best practice is to add different disk arrays for your data files.
- TempDb Log file: Initial size/Autogrowth allows to configure the initial size and step of the incremental growth of your tempdb log file. The same rules apply as for tempdb data files.
- Log Directory is the directory where the tempdb log file is stored. There is only 1 log file independent of the number of data files you have, and only 1 directory is specified. If possible, allocate a separate array for the log file as well.
The MaxDOP tab.
MaxDOP in an SQL Server setting that is responsible for running parallel queries and parallelism degree. In order your SQL Server to use all CPU cores in processing parallel plans, set 0 as the MaxDOP value. If you want to disable parallel queries on some reason, set 1 as the value. To gain maximum performance, configure MaxDOP according to the rules in the table below (https://go.microsoft.com/fwlink/?linkid=2084761):
| Server configuration | Number of processors | Guidance |
| Server with single NUMA node | Less than or equal to 8 logical processors | Set MAXDOP at or below # of logical processors |
| Server with single NUMA node | Greater than 8 logical processors | Set MAXDOP at 8 |
| Server with multiple NUMA nodes | Less than or equal to 16 logical processors per NUMA node | Set MAXDOP at or below # of logical processors per NUMA node |
| Server with multiple NUMA nodes | Greater than 16 logical processors per NUMA node | Set MAXDOP at half the number of logical processors per NUMA node with a MAX value of 16 |
In my case, I will set it to 0. This will give me maximum performance to run parallel queries, but it can also result in delays since other processes will have to wait till the current process is over, because all processor cores will be busy with executing the current query.
I still recommend to follow the rules listed in the table above for a server with a high workload. Also see the documentation following the link above.
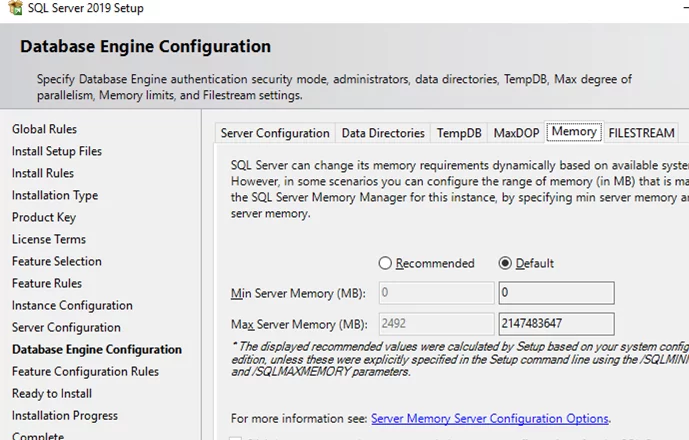
In the Memory tab, specify the minimum and maximum RAM size your SQL Server will use. Since it is quite hard to estimate the right size for a server, it is recommended to dedicate 80-85% of the whole server RAM to your SQL Server. To know the real size of RAM used, you need to monitor RAM usage 24 hours a day using special DMVs (Dynamic Management View). You can estimate a real RAM usage only if you have these data.
I will leave the default values (min 0 and max 2147483647 MB).
In the FILESTREAM tab, you can enable FILESTREAM feature. It allows to store binary files on the file system and provides access to them through SQL. If you are not sure if you want to work with binary data on the SQL level, leave FILESTREAM disabled.
The Feature Configuration Rules step will be done automatically. Read the information in the Ready to Install section and click Install.
Thus, you have completed basic SQL Server 2019 Enterprise installation. In the following article we’ll look at the main ways to analyze performance and problems in SQL Server.
Source: woshub
No comments:
Post a Comment
Thanks for your valuable comment...........
Md. Mominul Islam